How I built a set of book-shelf loudspeakers
Being tired of not causing my neighbours any significant grief, I
decided to upgrade from earphones to actual speakers. I settled on a
"kit" containing pre-cut bare wood and a set of units from the Danish
manufacturer Dynadio. The process of putting the things together is
still on-going, and was/is done in three major steps.
- From parts to assembled speakers.
Starting with nothing but some pre-cut MDMF and the speaker
units, I put the boxes together.
- The boxes needed veneering in order
to make them aesthetically acceptable. I applied proper wood
veneer (only mad dogs and hi-fi nuts try this). The end result
is actually not bad looking...
- The bass reflex ports need tuning,
simply because they were not right to start with. This is yet to
be done..
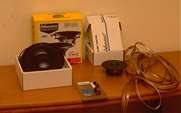 Speaker units from Dynadio, the
famous treble unit D28AF and the bass-mid unit 17W-75XL. As is
customary for Dynadio units, the cross-over is a simply first order
affair, with impedance correction for the treble. I bought the kit at
Haut-parleur systemes, 17th arr Paris.
Speaker units from Dynadio, the
famous treble unit D28AF and the bass-mid unit 17W-75XL. As is
customary for Dynadio units, the cross-over is a simply first order
affair, with impedance correction for the treble. I bought the kit at
Haut-parleur systemes, 17th arr Paris.
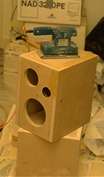
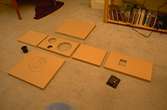 Bare wood for the boxes. The 14.5L
enclosures are constructed from 18mm MDMF (Medium Density Fibre
Board),
the best material for low-cost speaker boxes. The only beef I have
with the pre-cut materials is that they come together as a box which
has a slight edge on the front (so that one can use a grille and still
see some wood). This doesn't make acoustic sense, and I don't want to
use a grille anyway, so this edge went (at a later stage).
Bare wood for the boxes. The 14.5L
enclosures are constructed from 18mm MDMF (Medium Density Fibre
Board),
the best material for low-cost speaker boxes. The only beef I have
with the pre-cut materials is that they come together as a box which
has a slight edge on the front (so that one can use a grille and still
see some wood). This doesn't make acoustic sense, and I don't want to
use a grille anyway, so this edge went (at a later stage).
 Glueing the boxes, using nails for
guidance and clamps for actual force. Since the boards were pre-cut to
an acceptable precision, there was no real problem putting the boxes
together straight. Using a few hours a setting time for each side, I
was able to do the assembly in one day.
Glueing the boxes, using nails for
guidance and clamps for actual force. Since the boards were pre-cut to
an acceptable precision, there was no real problem putting the boxes
together straight. Using a few hours a setting time for each side, I
was able to do the assembly in one day.
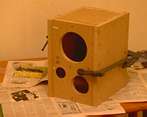
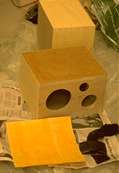
 Mounting the units in the finished
boxes. The edge on the front mentioned above is clearly visible.
Mounting the units in the finished
boxes. The edge on the front mentioned above is clearly visible.
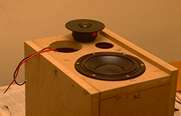
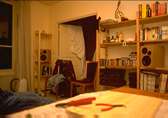 Sunday night Listening to the
result. I had spent all sunday putting the things together, so I
forgot about the 22:00 curfew on noise, and let rip for a few
minutes...
Sunday night Listening to the
result. I had spent all sunday putting the things together, so I
forgot about the 22:00 curfew on noise, and let rip for a few
minutes...
So, how do they sound? Well, I like the mid/treble (great voice
reproduction); the bass was a bit boomy with the original reflex ports
(which were the wrong size, anyway). The bass was sort-of fixed by
stuffing a pair of socks in each reflex opening. The perspective is
not too great, but Hi-Fi experts are falling over themselves in their
haste to recommend free-standing placement for good perspective (one
look at the picture should adequately document that I do not
have room for such luxury).
After a few hundred sarcastic remarks from sundry visitors (well, all
of them did make comments..), I was finally sufficiently motivated to
start veneering the boxes. My Hi-Fi friends were terribly encouraging
("I think it's easy; put the boxes in the trunk, drive to the
carpenter, pay to have them veneered", "Well, veneering is one of
those things one either does very well, or..."), but I decided to
press ahead anyway.
I went and bought some veneer (called "Koto" - whatever that is),
and had a go at it.
 Sanding the boxes after having sawed
off the hideous edges and filled the gaps. I used two-component filler
(probably epoxy) which sets really fast (a few minutes). On the
other hand, it doesn't shrink, and it sets completely (doesn't stay
soft in the centre), so I got a relaxed relationship with this - after
a few hairy moments.
Sanding the boxes after having sawed
off the hideous edges and filled the gaps. I used two-component filler
(probably epoxy) which sets really fast (a few minutes). On the
other hand, it doesn't shrink, and it sets completely (doesn't stay
soft in the centre), so I got a relaxed relationship with this - after
a few hairy moments.
 Glueing
veneer to
the boxes. This is the only step of the process which I would do
different the
next time. We [1] used contact glue which
sets sort
of instant on contact (hence the name, duh..). The problem is, that I
had only
made the panels slightly over-size. So, if we aligned a panel wrong,
we might
miss the edge of the box, and have to rip the veneer off. In one case
we had to
make a new panel, and in another case (the last panel - a front), we
only just
managed to get the panel off without wrecking it. Since there is a
perfectly
good alternative to contact glue (the same veneer comes with
thermo-glue
pre-applied, so it's possible to affix the veneer using an iron), I
can only
recommend that one doesn't use contact glue.
Glueing
veneer to
the boxes. This is the only step of the process which I would do
different the
next time. We [1] used contact glue which
sets sort
of instant on contact (hence the name, duh..). The problem is, that I
had only
made the panels slightly over-size. So, if we aligned a panel wrong,
we might
miss the edge of the box, and have to rip the veneer off. In one case
we had to
make a new panel, and in another case (the last panel - a front), we
only just
managed to get the panel off without wrecking it. Since there is a
perfectly
good alternative to contact glue (the same veneer comes with
thermo-glue
pre-applied, so it's possible to affix the veneer using an iron), I
can only
recommend that one doesn't use contact glue.
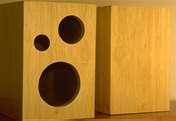 Finished and lacquered boxes. After
lacquering (during which I damaged more - 2 - of the fragile edges
than I had during the actual veneering), I cut holes for units. One
notices the mirror-imaged matched fronts. This came about because I
had bought a wide roll (50cm) of veneer; this was actually two narrow,
mirror-imaged, pieces glued together on the back. So, since the box
was narrower than half the width of the roll of veneer, I was able to
cut two mirror image panels. Very nice, even if I do say so myself...
Finished and lacquered boxes. After
lacquering (during which I damaged more - 2 - of the fragile edges
than I had during the actual veneering), I cut holes for units. One
notices the mirror-imaged matched fronts. This came about because I
had bought a wide roll (50cm) of veneer; this was actually two narrow,
mirror-imaged, pieces glued together on the back. So, since the box
was narrower than half the width of the roll of veneer, I was able to
cut two mirror image panels. Very nice, even if I do say so myself...
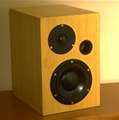 Finsished speakers. One speaker with
units and all. I really wanted brass bolts (with allen heads) for
mounting the units, but haven't been able to locate any. Apart from
that, the best result I could possibly expect!
Finsished speakers. One speaker with
units and all. I really wanted brass bolts (with allen heads) for
mounting the units, but haven't been able to locate any. Apart from
that, the best result I could possibly expect!
Thank you notes
Thanks to Steven E. for materials and tools.
[1] Thanks also the Rosa G. for
materials/tools, but above all for helping out with the actual
veneering process, and getting the bright idea which saved the last
panel from being a complete disaster. Absolutely couldn't have done it
without you!
Last modified: Mon Dec 15 10:35:59 CET 1997